New Service Desk experience
Introduction
The New View of Service Desk is designed for faster navigation with a simple, intuitive user interface. The new ticketing interface is set as the default interface for all new users and tenants, as well as for profiles that have not yet switched to the New View. However, users can switch to Legacy View anytime under My Settings > Preferences > Service Desk Experience > Legacy View.
Prerequisite
- Users must minimally have access to view tickets.
Setup
Switching to the New View of Service Desk
- Navigate to < your name on the top right corner > My Settings. The My Profile page opens.
- Click the Preferences tab.
- Service Desk Experience: Select New View from the dropdown. This setting is applicable at the user profile level. (To switch back to Legacy View, select Legacy View from the dropdown.)
- The ticket listing in Service Desk > Tickets will show the New View of Service Desk.
Setting up ticket defaults
You can set up ticket defaults in Admin > Service Desk > Ticket Configuration page. For more information, see Ticket Configuration.
Features
Search Pane
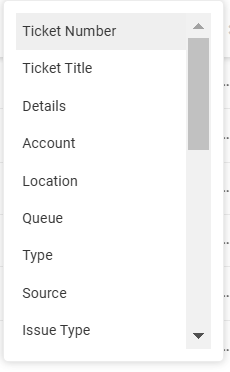
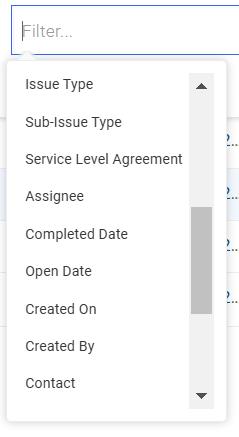
- The search pane is designed to work in a compact space. Select the desired columns for the filter tab and apply them to the ticket listing.
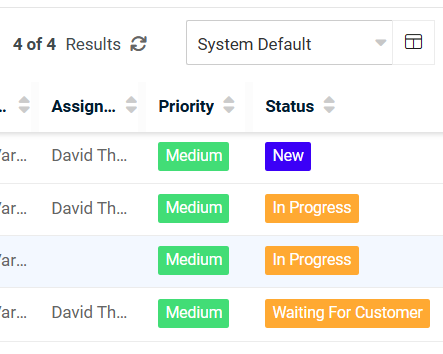
- You can filter the tickets by various columns. These columns appear as a dropdown in Filters box. Filters include Ticket Number, Ticket Title, Details, Account, Location, Queue, Type, Source, Issue Type, Sub-Issue Type, Service-Level Agreement, Assignee, Completed Date, Open Date, Created On, Created By, Contact, Last Update, Scheduled, Is Recurring Ticket, Ticket Owner, Hardware Asset, and Account Code.
- Clear filters individually or all at once.
- Scrolling for tickets in the ticket listing is enhanced for virtual scrolling. The headers are frozen and the ticket list auto-updates as you scroll down the page.
- Ticket listing page auto-refreshes every 15 minutes. Ticket tabs refresh with a manual refresh action or with the keyboard shortcut "R."

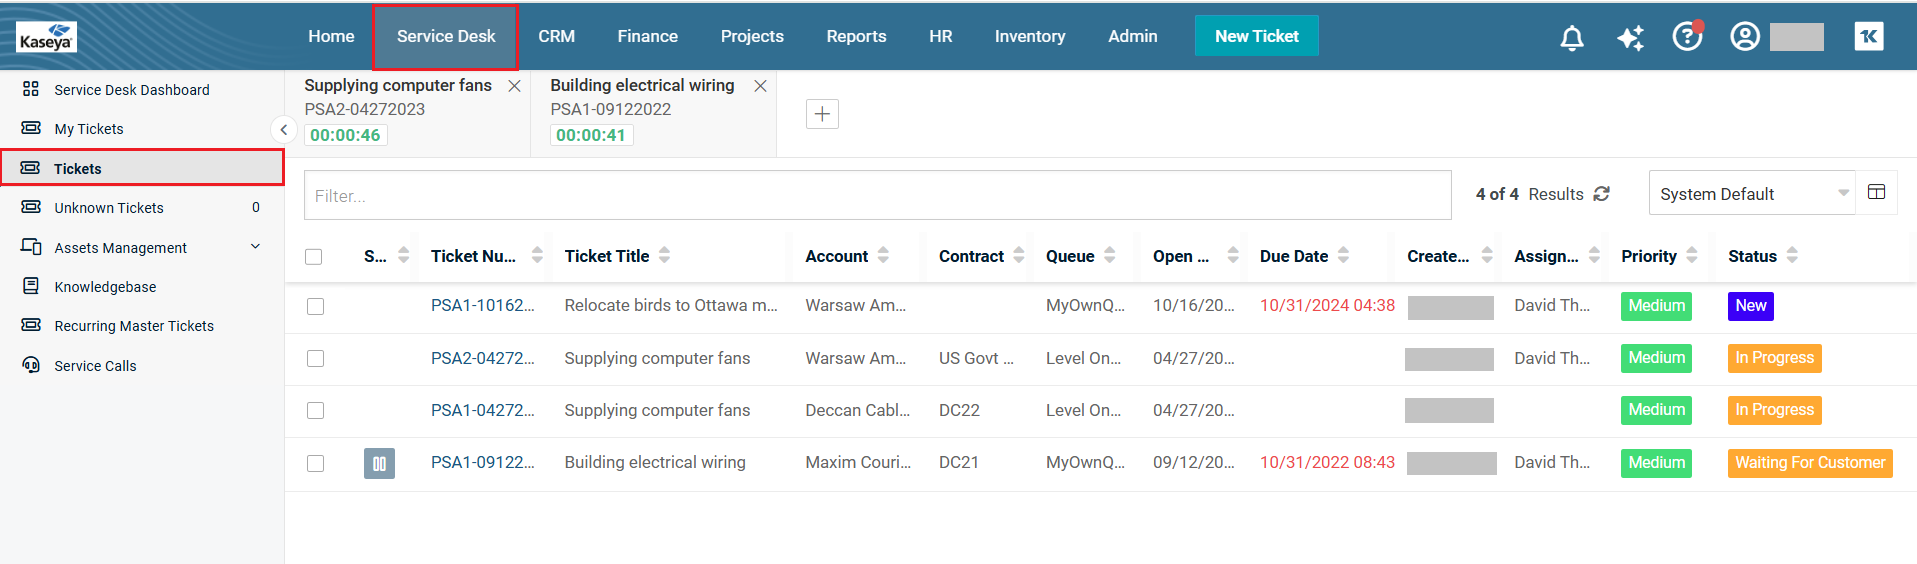
Tabs
If you open multiple tickets at once, you will see them lining up as tabs, next to each other. You can navigate among these tickets with a single click or navigate among views, lists, or individual tickets.
- When you have a search filter on the ticket listing page, you can open tickets in a new tab and save your search results in the session so that all your data is visible in one window of the Tickets page.
- Tabs are all saved as-is for the current logged-in session. If you navigate out of the module or close the browser, the tabs' session will also be refreshed and the tab list will be closed.
- Timers on tickets will start to auto-run depending on your company settings for auto-start.
- You can configure the timer to start automatically whenever a ticket is opened or updated by selecting the checkbox next to Stopwatch Autostart option in Admin > Service Desk > Ticket Configuration page > Ticket Defaults section.
- Refreshing the tab or window will refresh the timer.
- Hover over any tab to get a sneak peek description of a ticket.
- Multiple tabs can be opened in a single window. When the space is full, the tabs collapse into the dropdown that can be accessed by clicking the dropdown icon at the end of the tabs.

Columns
- Click the column icon in the ticket listing .
- You can choose your columns. Drag and drop your fields.

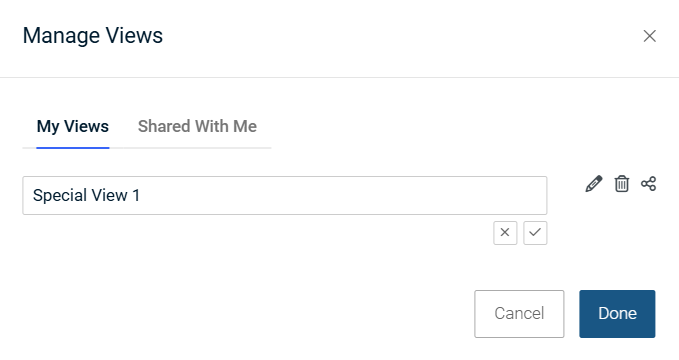
Views
- Save and switch between views easily.
- The user icon next to a view indicates that the view is not owned by the current user.
-
Manage views will list the views owned and shared with you.
-
You can see who the owner of the shared views is and reach out for any changes.
-
You can see who the owner of the shared views is and reach out for any changes.
-
The new Service Desk has a default view called system default.
- A system default view is used as default view if no view was previously selected by the user.
- BMS shows the last selected view on the browser when you navigate back to the tickets.

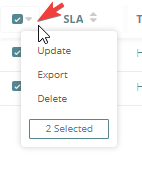
Batch actions
Batch actions in the new Service Desk will enable you to perform multiple actions at once.
- Select multiple tickets from the listing. You can make changes to a ticket with Update and export or delete entries using Delete and Export.
-
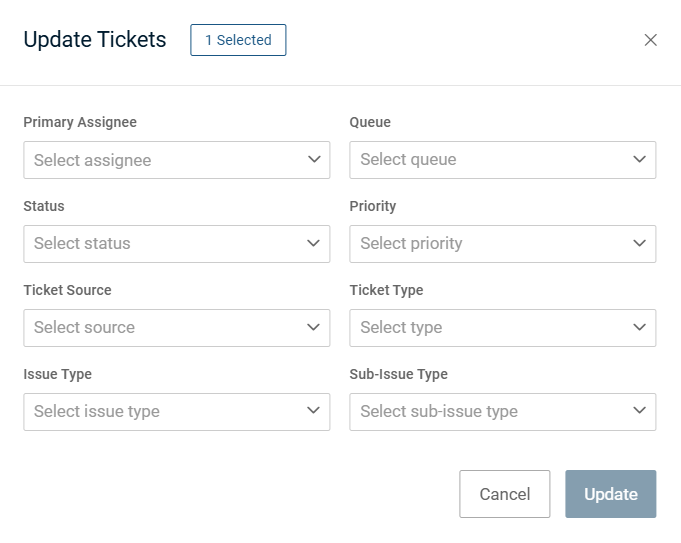
Choose Update
- This will allow you to make multiple changes on a ticket with the Update button.
- Check Logs for the record of the changes made.
Working on tickets
All your BMS ticket data will be displayed among these sections on the page:
- Main panel
- Ticket tabs
- Side panel
1. Main panel
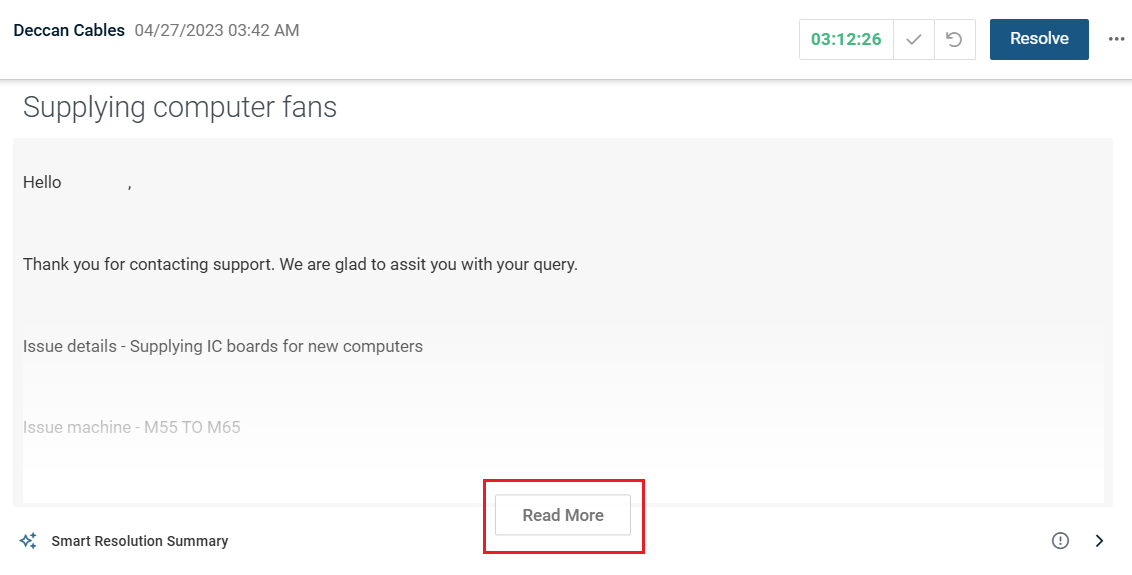
Navigate to Service desk > Tickets to access your Ticket list view. Click the ticket number to open the particular ticket. The ticket details appear in the middle of the page. Click the Read More button to see the entire description.
In the main panel, you can manage your committed time on the open ticket. Click the check mark next to the timer to open the Time Log form. For each time log, there is a running timer that starts counting from zero once the ticket is opened and continues to run while the time log form is open.
NOTE If you manually adjust the start time or the committed time on the ticket, the timer will stop. You have the ability to restart the timer on any open ticket by clicking the Restart button.
The key time entry usability points are as follows:
- When the Time Spent field is in focus, the input field will be completely auto-selected.
- Users can type decimal numbers freely.
- Adding time entry in new Service Desk supports free text in the Date and Time fields.
- Delete/Backspace on the input number will work without automatically replacing it with zero.
- Start time and end time will be calculated after any update in the time spent field and vice versa.
- Keyboard shortcuts have been introduced with new Service Desk. Alt + / will list the shortcuts that are applicable. Find the detailed guide here.
- Admins can prevent users from deleting their own time entries.
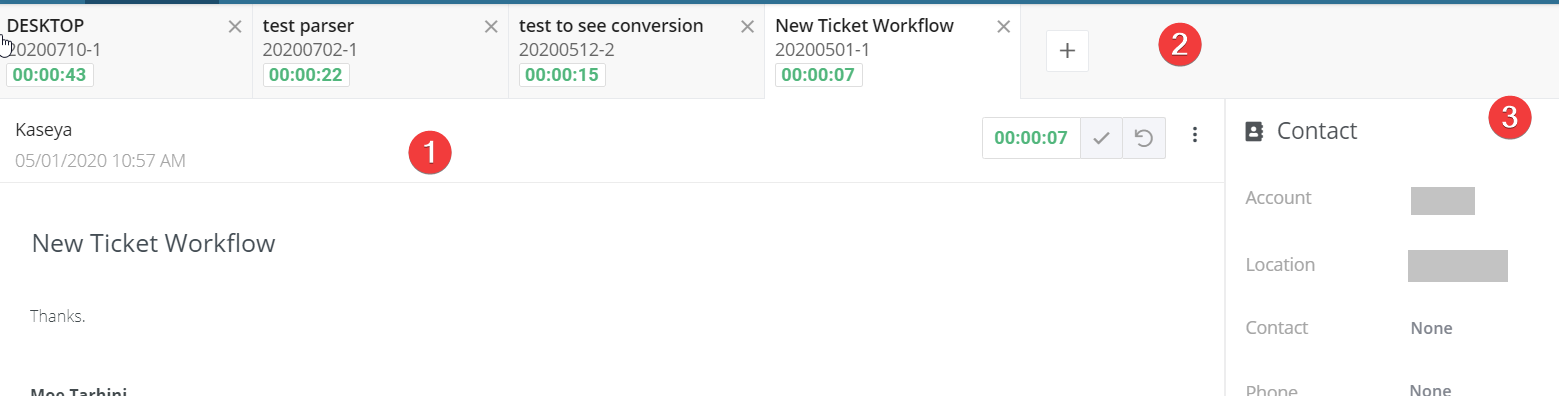
2. Ticket tabs
The top of the Ticket page displays a tab panel with all tickets that are currently open. Clicking any of these tabs will bring the corresponding ticket to the foreground. Each of these tabs displays the title, priority, ticket number, and a running timer. You can preview a ticket by hovering over the ticket tab. You can also rearrange the order of the tabs if desired. To close a tab, click the x icon on the tab.

You can start and stop the timer directly from the ticket tab. The timer starts counting from zero once you open a ticket. If you have a ticket open in multiple browser tabs, each timer starts from zero and can be committed.
NOTE Navigating away from the ticket or closing it will discard any uncommitted time.
- The Ticket tab can be opened in the background without leaving the Ticket list view.
- Hold onto CTRL/CMD key and click the ticket number.
3. Side panel
The side panel is where you can quickly browse certain categories of details such Details, Contact, Custom Fields, Attachments, and Duplicate Alarm. Inline editing using auto-complete is supported in this panel and data can be updated within the ticket.
A scroll bar to separate the content from the properties of a ticket is visible as the side panel's left border. The ticket details section and the side panel have individual scroll bars.
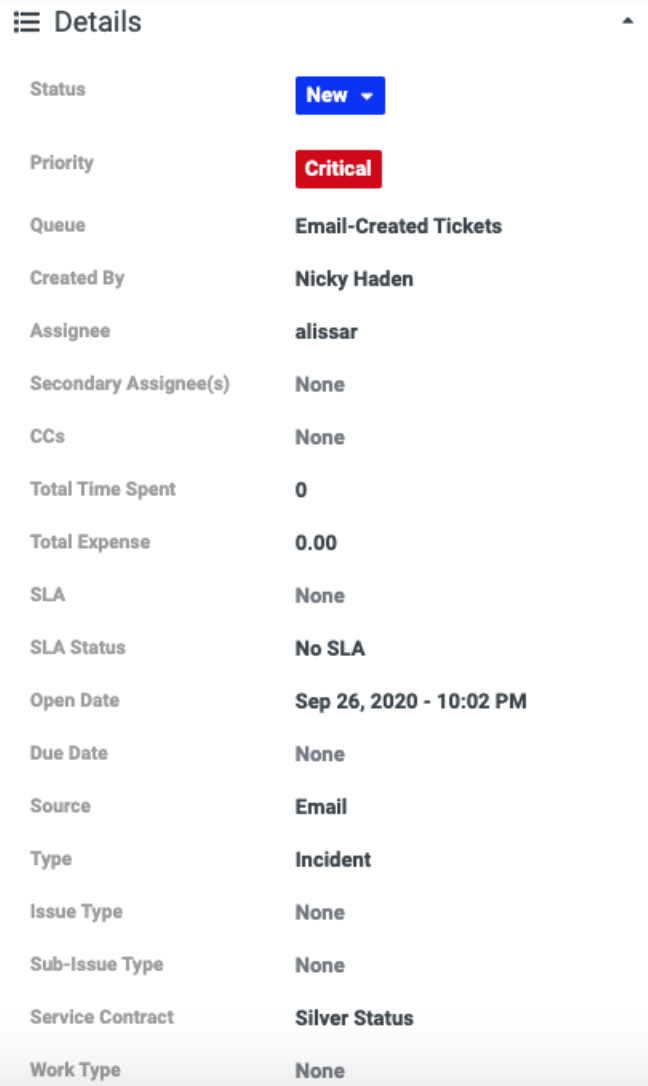
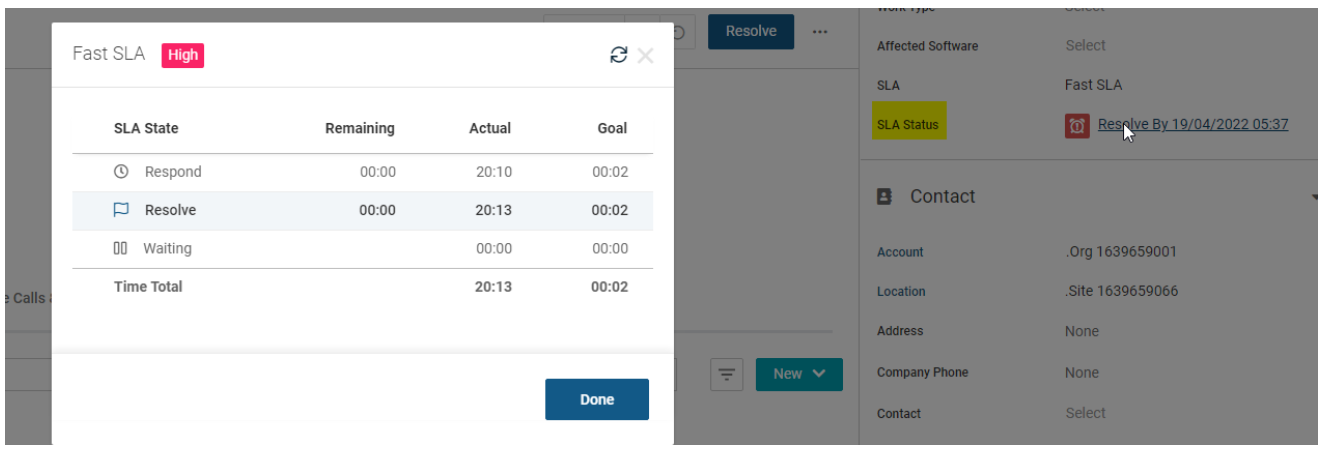
- Details - View Status, Priority, Queue, Created by, Assignee, Secondary Assignee, CCs, Total Time Spent, Total Expense, SLA, SLA Status, Open Date, Due Date, Source, Type, Issue Type, Sub-Issue Type, Service Contract, and Work Type. SLA Status is now available for a ticket. The hyperlink displays details of the SLA in a pop-up. Chat is one of the ticket source options.
- You can change statuses and edit notes at the same time.
- Contact Custom Fields
- Contact Custom fields are displayed in the ticket details panel.
- Values in the panel are read-only.
- The display order can be set in Admin > My Company > Custom Fields. For more information, see Custom Fields.
- The first three items will be displayed, and a show more/less toggle can be used to collapse or expand the list.
- Contact Custom fields are displayed in the ticket details panel.
- Select Complete field
-
When clicking:
-
Any editable field on the side panel, data in the field will be completely selected. Any typed text will replace the field selected.
-
Any field, a dropdown list will directly open.
-
-
- RMM Integration - This section will only appear if there is an active RMM integration (VSA or Continuum).
- If a Kaseya PSA/VSA integration is enabled, the ticket displays the ticket number as read-only.
- If a Kaseya PSA/Continuum integration is enabled, both the Ticket Owner field and the ticket number are displayed in read-only mode.
- Attachments - Drag and drop your selected file into the dotted line field to upload the attachment.
- Drag and drop multiple files at once under Attachments. When attachments from a ticket are downloaded, the original filenames are shown. This section shows the top fives files in the side panel.
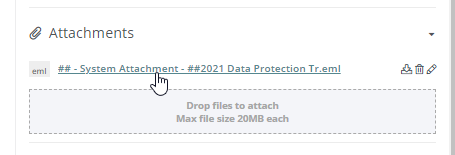
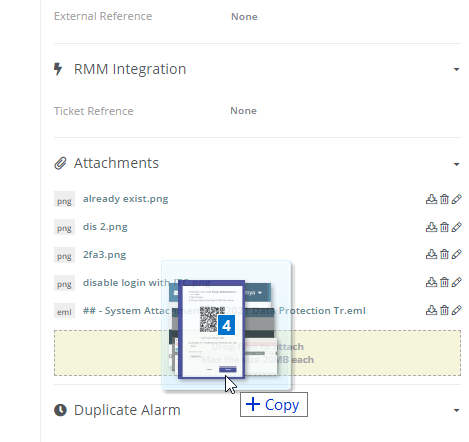
- Drag and drop multiple files at once under Attachments. When attachments from a ticket are downloaded, the original filenames are shown. This section shows the top fives files in the side panel.
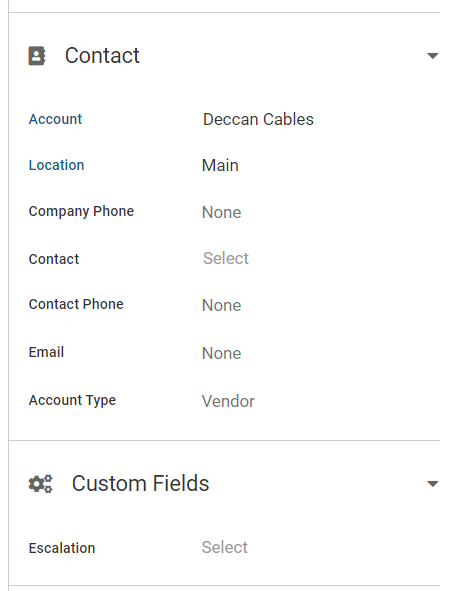
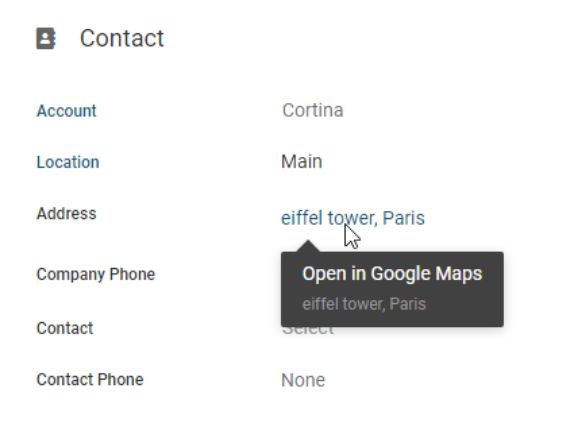
- Contact
- The address field is displayed on the Contacts side panel of a ticket.
- Addresses will display a hyperlink and will open in Google Maps.
- CRM > Account > Location > Address details need to be filled for this to populate.
-
Survey History
With an active survey integration, users should be able to see a collapsible panel that contains the latest survey score for a ticket. This section is available only for those users who have enabled Customer Thermometer integration.

Ticket data
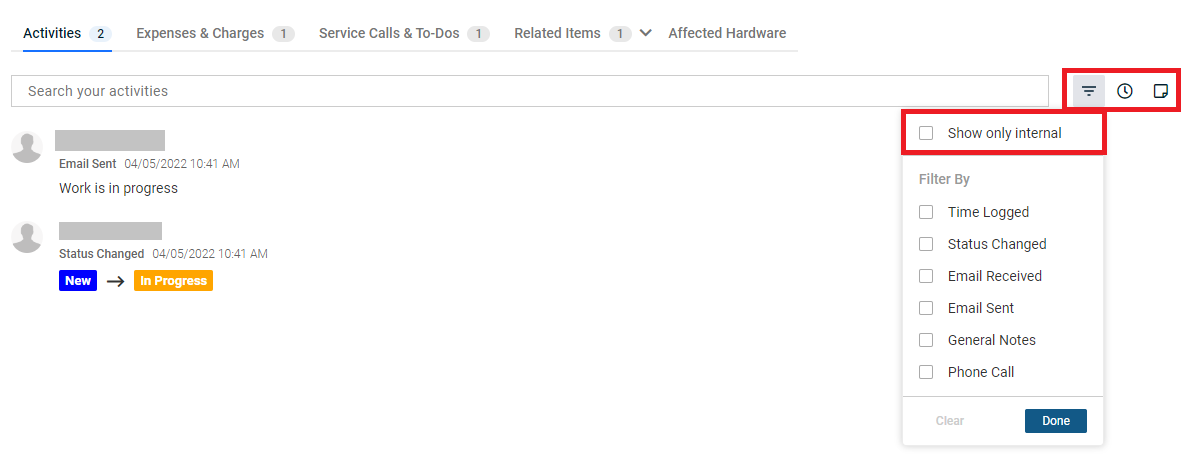
- Activities - This is an up-to-date log of all notes and activities related to the ticket. This section will also show updates to any of the ticket’s details. You can filter the activity log by one or more types of activities or search through the log’s content. The filter option Show only internal is the first filter option that you will find and will show only internal ticket activities once you select it.
- Tab Indicators: Indicators are available to identify additional items embedded across tabs in a ticket.

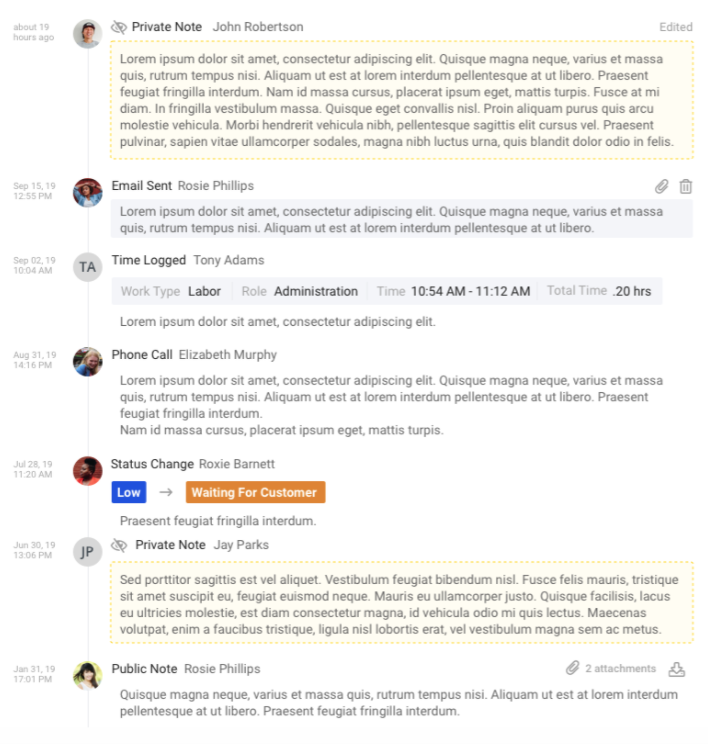
To add a new note, click the note icon next to the time icon. (See the below image with the highlighted icon.)
- In the Add Note window, in the Note Details tab, select a template macro, select a date (today’s date is the default), type, status, and enter your comments. Drag the Make Note Internal slider to the right to make the note internal. By default, the note will be an external note. An internal note will make your comments remain private. A set of special features are available in the security role so that an MSP can edit their own note and another user's note if they have permission to do so. Under Special Features, Prevent user from editing own ticket notes checkbox and Prevent user from editing other user’s ticket notes are available. By default, these are set to false. This will remain so until you change this setting. This is added under Admin > Security > Roles > Service Desk > Special Features.
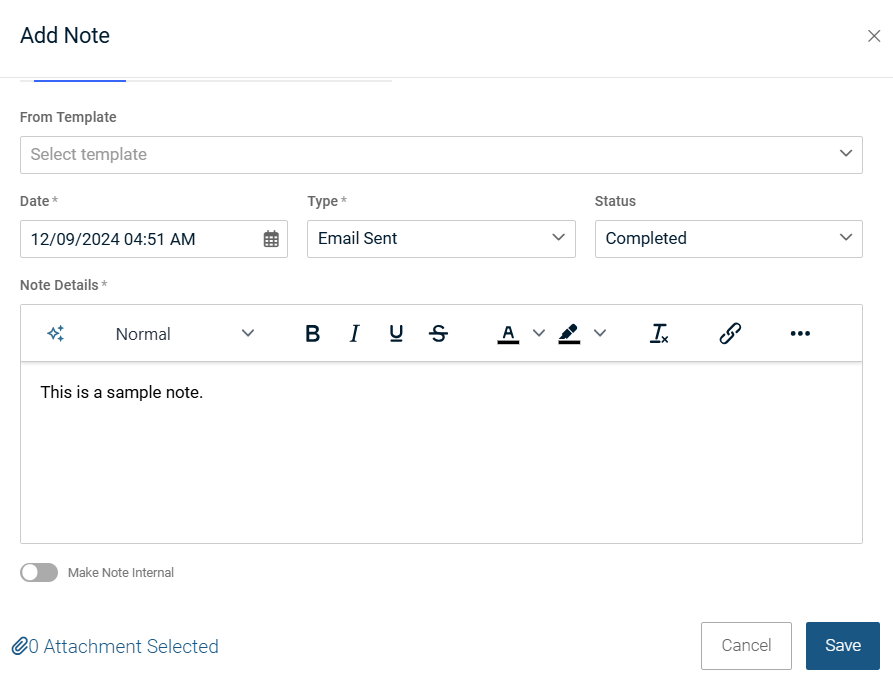
- In the Add Note window, in the Note Details tab, select a template macro, select a date (today’s date is the default), type, status, and enter your comments. Drag the Make Note Internal slider to the right to make the note internal. By default, the note will be an external note. An internal note will make your comments remain private. A set of special features are available in the security role so that an MSP can edit their own note and another user's note if they have permission to do so. Under Special Features, Prevent user from editing own ticket notes checkbox and Prevent user from editing other user’s ticket notes are available. By default, these are set to false. This will remain so until you change this setting. This is added under Admin > Security > Roles > Service Desk > Special Features.
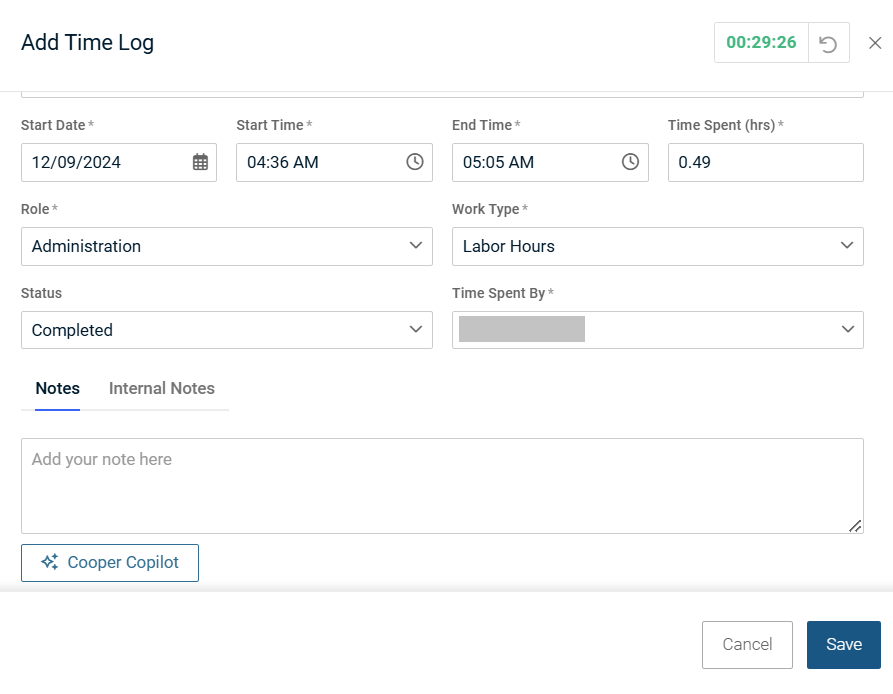
- Adding Time: To add time, click the time icon next to the note icon.

- By default, you will be in Time Details tab. Select a template from From Template dropdown.
- Select Start Date, Start Time, and End Time. Time Spent is automatically calculated by your input values.
- Select Role, Work Type and Status. The logged in user's name will automatically reflect in Time Spent By dropdown.
- Add your notes under Notes and Internal Notes.
- In the Notifications tab, select Contact, Resource and Email Template. Enter other email IDs separately under Other Emails.
- In the Custom Fields tab, enter appropriate values.
- Click Save.
- Purchase Order: The ability to create an order from a ticket for the selected charge is available.
- Go to Tickets.
- Open the relevant ticket.
- Go to Expenses and Charges tab.
- Underneath the New button, click the cart icon. The Purchase Order popup opens.
- Other tabs like Expenses & Charges and Service Calls & To-Dos function the same way as in Legacy View.
- To add expenses and charges, complete the following steps:
- Click the Expenses & Charges tab.
- Click the Add Expenses icon. The Add Expense window opens.
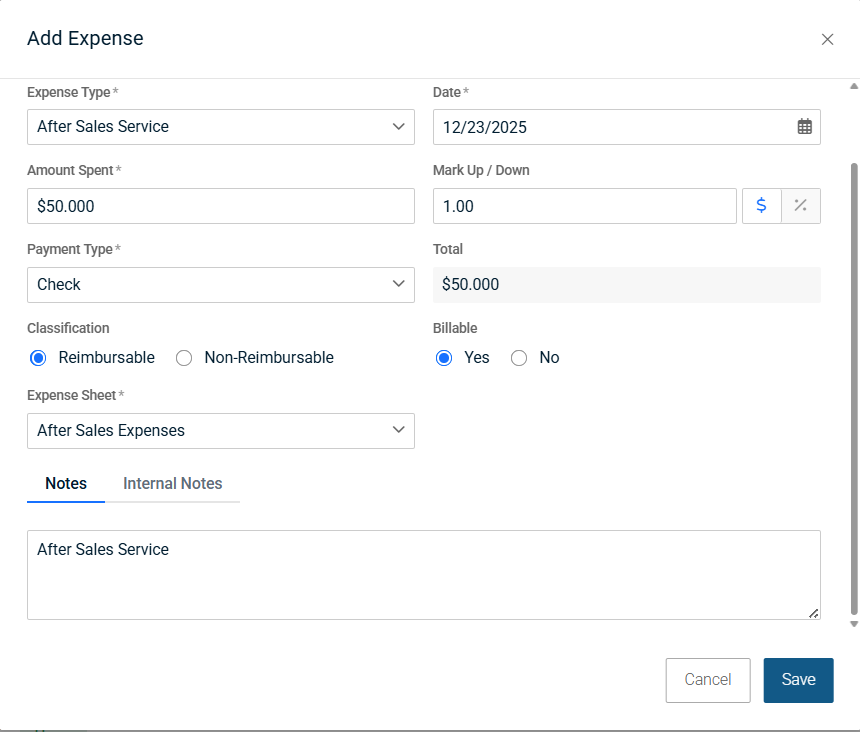
- Expense Info tab: Enter/Select the necessary details.
- Navigate to Receipts tab.
- Attach relevant receipts.
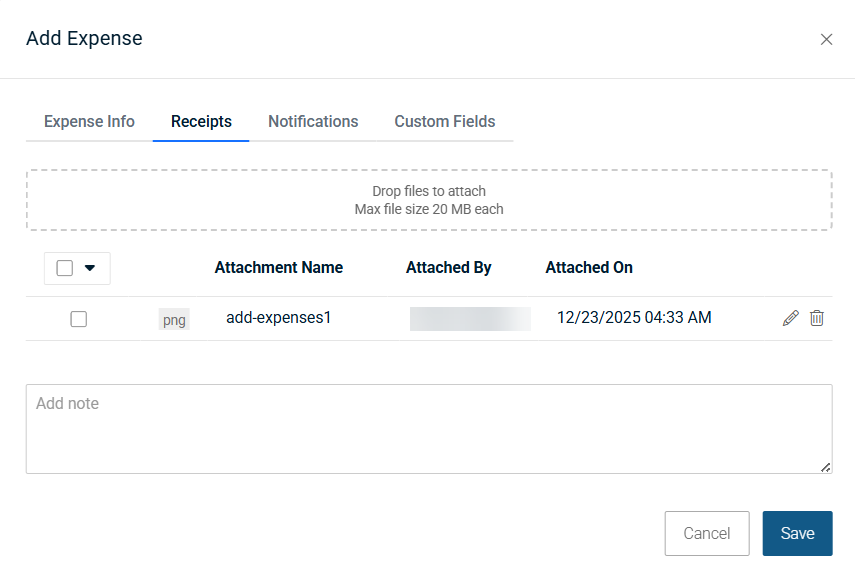
- Navigate to Notifications tab.
- Enter/Select the necessary details.
- Navigate to Custom Fields.
- Enter/Select the necessary details.
- Click Save. The expenses are added under the Expenses & Charges tab.
- The ability to deliver a charge from the ticket is available.

- The Serial Number field is now exposed to the UI.
- To add expenses and charges, complete the following steps:
Ticket actions
Resolve, Refresh, Assign, Merge, Absorb, Print, Audit Log, and Delete are the actions that can be performed on the ticket. Technicians with access only to their tickets via queues cannot see other tickets when choosing Merge/Absorb functions.

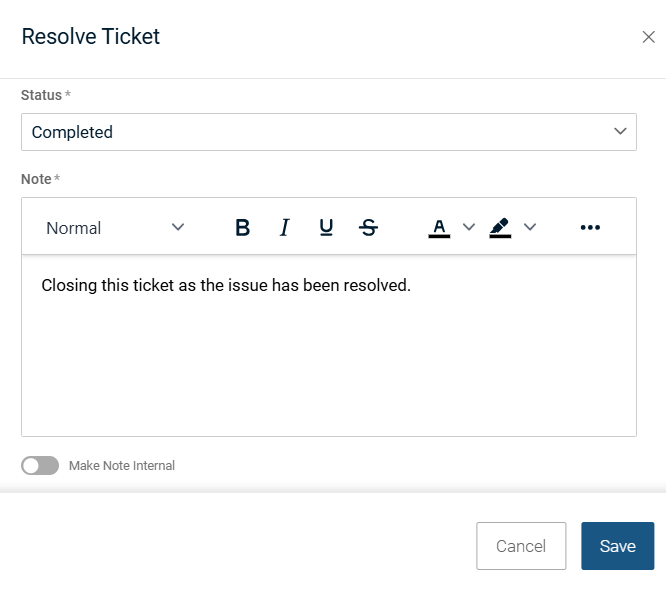
- Resolve - You can click Resolve in the Resolve Ticket window to close a ticket with a note and the Status in the Details panel will show Completed. You have the option to set the note within the Resolve Ticket window as Internal or External.
- Refresh - Individual ticket tabs can be refreshed using the Refresh button.
- Audit Log - The Audit Log shows all the activities performed on a ticket. The Audit Log consists of three tabs - Ticket Logs, Workflow Logs, and Agent Procedure Run Logs. When technicians edit notes and time entries added to tickets, they are shown in the Audit Log.
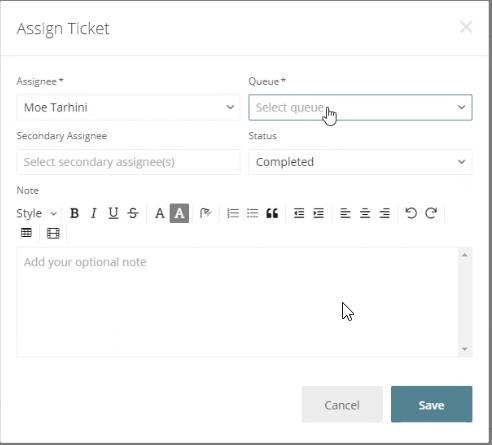
- Assign - Assign button enables you to perform multiple actions at once on a ticket.
- You can assign the ticket to a tech, change the queue, add a note, update a status etc. -all in one go.
- You can assign the ticket to a tech, change the queue, add a note, update a status etc. -all in one go.
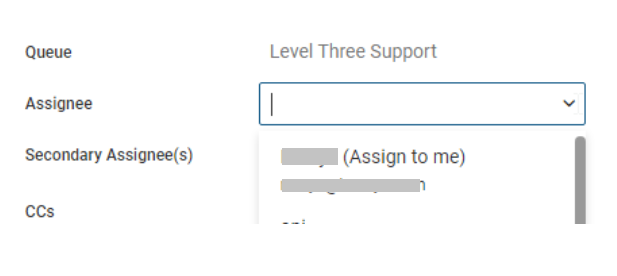
- Keyboard Shortcuts: The Assign to me shortcut with the sort order showing the currently logged-in user on the top is added. Sometimes, the Assign to me option may not be visible. If you type in the dropdown and clear the text, the Assign to me option will not show. To make it visible, close the dropdown and click the down arrow. It will show.
Related Items
-
Suggested Docs
- For better visibility, IT Glue suggested docs and password dropdown are now placed above the ticket title.

-
IT Glue can automatically suggest documents and passwords related to your tickets. Refer to Configure ticket settings for suggested IT Glue documentation in BMS tickets to learn more about suggested IT Glue documentation.
- Open a ticket and navigate to the Related Items tab.
- The Suggested Docs link is available only in the New View and with an active IT Glue integration.
- In the Suggested Docs link, all the documentation and passwords based on the IT Glue rules will be displayed.
- A Copy and a Shield icon is displayed in Related Items > Passwords.
- Deep links for a document or a password will redirect you to the IT Glue page and open the linked-related document in a new tab.
- For better visibility, IT Glue suggested docs and password dropdown are now placed above the ticket title.
- Tickets:
- The Tickets tab links other tickets with the current ticket. Click New to create a link.
- Clicking a related ticket opens the related ticket in a new tab, enabling you to work on both tickets in tandem. When you add a related link, links are created in both tickets.
- Project tasks
- Tickets from the Service Desk module and tasks from the Projects module can be linked to each other to provide a seamless intersection between tickets and tasks. For more information, see Linking tickets and tasks .

- Tickets from the Service Desk module and tasks from the Projects module can be linked to each other to provide a seamless intersection between tickets and tasks. For more information, see Linking tickets and tasks .
Affected Hardware
The Affected Hardware gives you information about hardware that are affected by this ticket. You can add hardware that are affected by the ticket by clicking the Add Asset button under this tab.
Timeline of a ticket
All activities on a ticket will be displayed in the timeline with the ability to filter the activity type. Scrolling is enabled here so that the historical data is available as and when you scroll down the timeline view.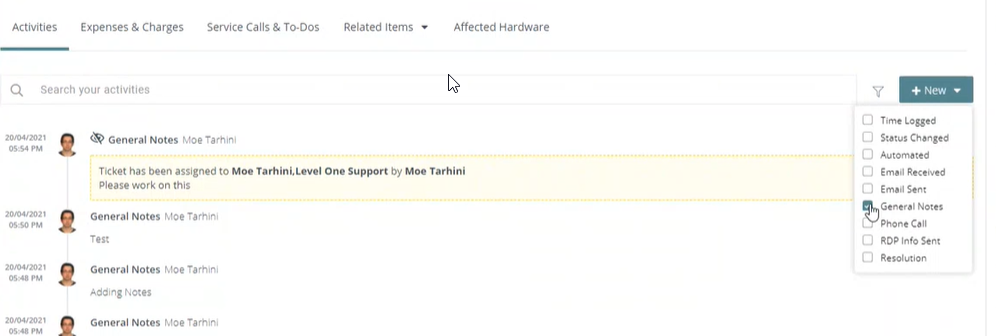
Adding a new ticket
- Use the New button or the plus mark icon to create a new ticket. This will open a new tab alongside your open tabs.
- After clicking Save, the ticket will change to view mode in the tabs.
- Save, Cancel, and Time functions stick to the page of the ticket header when creating a new or working on existing tickets.

Tips
- New Service Desk is available on My Tickets and Service Desk tickets pages.
- My Profile > Preferences > Default Tickets Listing Click Behavior: This option is not applicable to the New View of Service Desk.
- For multi-tenant environments, New View of Service Desk is only supported on child tenants, not on the parent tenant.
Demo: New Service Desk
BMS - New Service Desk from Kaseya , Inc. on Vimeo.


